Post by Deleted on Jun 23, 2010 1:48:10 GMT -5
Humidifier air transfer system.
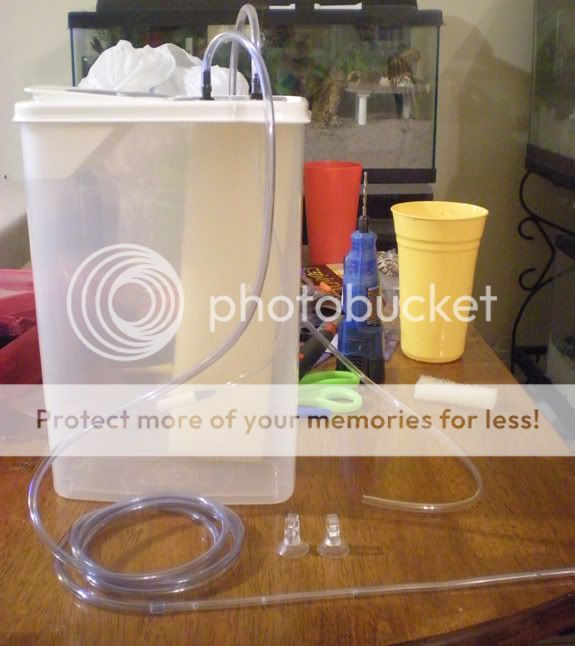
I have made my own copy of the TropicAire with a few minor improvements such as easier to fill and you can actually change out the sponge! I like using the cereal canisters for this because you can refill the system without taking the whole lid off. These are designed so that the humid air builds up from the sponge and air stone and is eventually forced through the small hose leading to the tank. It then releases fresh moist air, without the extra moisture that misters can cause. They are very affordable to make especially if you order the aquarium parts online. So here are the things we will need.
First the tools:
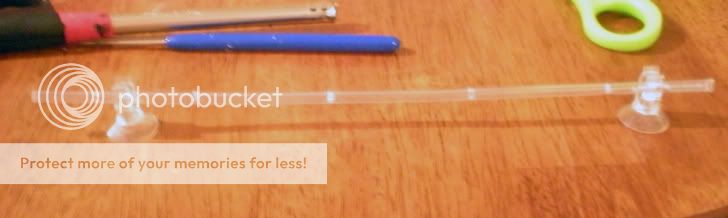
• Scissors
• Lighter (D in photo)
• Sharp metal rod such as a bead reamer (C in photo)
• Silicone aquarium sealant
• A tool to cut holes such as a dremel
• Bit of waterproof glue that is good on plastics

Supplies:
• Air tight plastic container such as a storage box for cereal
• Air tubing
• 18 inches of rigid air tubing (b in the picture above)
• 2 air hose connectors
• 1 air stone
• 1 filter sponge almost as tall as the container
• Air pump rated for the size of your tank (each container can support 50 gallons, if more is needed add another system)
• A little bit of fishing line
• 2 mini light cord holders with suction cups (or the small suction hooks) A in the picture above

Part One:
Prepare the rigid hose.
You will need the lighter, bead reamer, silicone sealant, and rigid tubing for this part
1. Mark your tubing at two inch increments so you know where to make the holes. We are going to make holes using the bead reamer all the way through the tubing so that there is a hole on each side.
2. Carefully heat up the bead reamer (kids get mom or dad’s help with this).
3. Poke holes at the markings all the way through, make sure to bore them out enough so they are not blocked or too small. If you make them too large the system will not work efficiently. I would say a good size is about 2mm.
4. Fill one end with about an inch of silicone, set aside to dry. It will take 24 hours to cure.


Part Two:
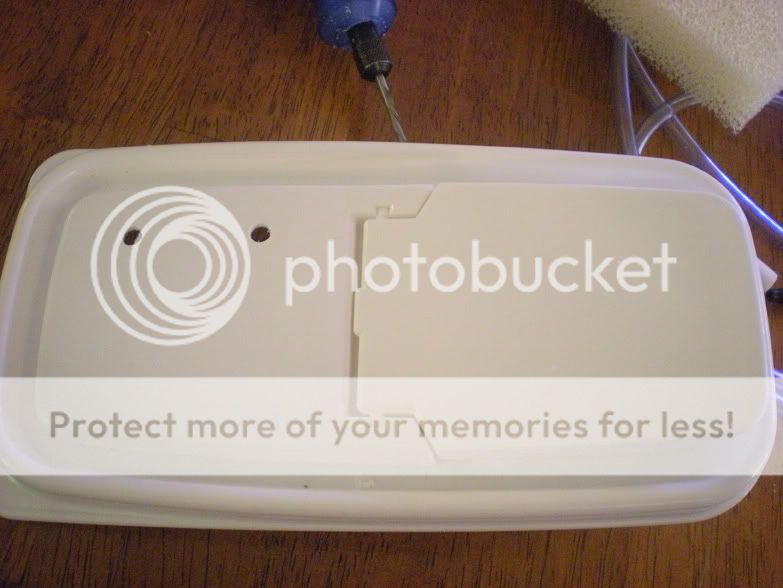
Prepare the lid:
You will need the lid, air hose connectors, air hose, air stone, cutting tool ( I used a dremel, but if you are careful a knife will work too) and waterproof glue for this step.
1. Use your hose connectors as a guide and make two holes about an inch and a half apart. Try to make the holes a snug fit the idea is to keep things air tight.
2. Force the connectors through so there is a connecting piece on each side of the lid (one inside, one outside) use the glue on the outside part of the lid to secure the connectors. Let them dry.
3. Carefully attach the air stone to some hose, make sure when hanging from the lid the air stone is just above the bottom, not to high and not touching, this will give you the best results.
4. Connect the air hose to the inside of lid on one of the connectors; this is your air pump line. You will then connect a hose to the outside of this same connector that is just long enough to go to the air pump. If you need to use a bigger pump you will have to merge two air ports on to one line using a t connector.
5. Connect another hose to the connector we have not used yet, on the outside. This will be the hose that has the rigid tube on the end of it that goes into the tank. Don’t make this hose any longer than you have to will not be as effective.


Part Three:
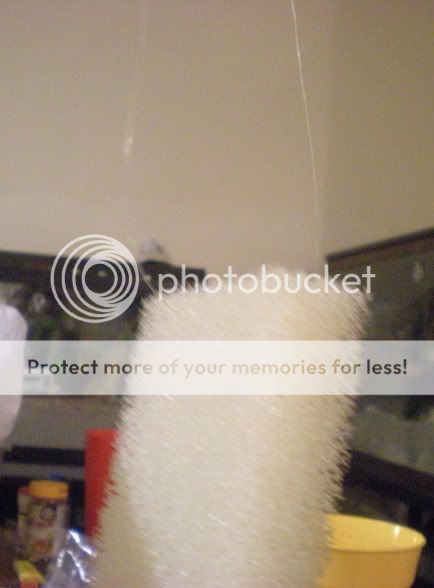
Add the sponge:
You will need the sponge, fishing line, assembled lid, and canister for this step.
1. Measure the sponge against your container it should be a little shorter but not a lot.
2. Thread the fishing line through the sides of the sponge so that you could hang it. This step is not precise as long as it hangs in the canister toward the very top without blocking the air connector ports that is all that matters.
3. Tie the sponge to the lid.
4. Now attach the lid to the canister.
Final assembly:
1. If you have not already add the rigid tube to the hose that is going into the tank (the one without the air stone)
2. Connect the air pump to the other hose
3. Attach cord holders to back center of tank about an inch above the substrate, you will have to reconnect these from time to time because the crabs love to climb them.
4. Snap the rigid tube to these cord holders.
5. Fill canister, using the handy flip hatch, with declorinated water stopping with about 2 inches to spare.
6. Plug in air pump.
It will take the system about 10 hours to really do it’s thing, after that it should maintain a nice level of humidity for you. Maintenance: it is necessary to rinse and dry out the canister every 3 months or so. You should also rinse out the sponge if it is in bad shape replace it. You should check he hoses, connectors, and air stone for mildew. Replace them when needed.
*note* These work best on tanks with glass lids or covered in some way, since it is air and not water it will simply escape into your house instead of staying in the tank.
Please feel free to ask me questions about this, I know there are a lot of steps but it is really easy once you get started :-)
I have made my own copy of the TropicAire with a few minor improvements such as easier to fill and you can actually change out the sponge! I like using the cereal canisters for this because you can refill the system without taking the whole lid off. These are designed so that the humid air builds up from the sponge and air stone and is eventually forced through the small hose leading to the tank. It then releases fresh moist air, without the extra moisture that misters can cause. They are very affordable to make especially if you order the aquarium parts online. So here are the things we will need.
First the tools:
• Scissors
• Lighter (D in photo)
• Sharp metal rod such as a bead reamer (C in photo)
• Silicone aquarium sealant
• A tool to cut holes such as a dremel
• Bit of waterproof glue that is good on plastics
Supplies:
• Air tight plastic container such as a storage box for cereal
• Air tubing
• 18 inches of rigid air tubing (b in the picture above)
• 2 air hose connectors
• 1 air stone
• 1 filter sponge almost as tall as the container
• Air pump rated for the size of your tank (each container can support 50 gallons, if more is needed add another system)
• A little bit of fishing line
• 2 mini light cord holders with suction cups (or the small suction hooks) A in the picture above
Part One:
Prepare the rigid hose.
You will need the lighter, bead reamer, silicone sealant, and rigid tubing for this part
1. Mark your tubing at two inch increments so you know where to make the holes. We are going to make holes using the bead reamer all the way through the tubing so that there is a hole on each side.
2. Carefully heat up the bead reamer (kids get mom or dad’s help with this).
3. Poke holes at the markings all the way through, make sure to bore them out enough so they are not blocked or too small. If you make them too large the system will not work efficiently. I would say a good size is about 2mm.
4. Fill one end with about an inch of silicone, set aside to dry. It will take 24 hours to cure.
Part Two:
Prepare the lid:
You will need the lid, air hose connectors, air hose, air stone, cutting tool ( I used a dremel, but if you are careful a knife will work too) and waterproof glue for this step.
1. Use your hose connectors as a guide and make two holes about an inch and a half apart. Try to make the holes a snug fit the idea is to keep things air tight.
2. Force the connectors through so there is a connecting piece on each side of the lid (one inside, one outside) use the glue on the outside part of the lid to secure the connectors. Let them dry.
3. Carefully attach the air stone to some hose, make sure when hanging from the lid the air stone is just above the bottom, not to high and not touching, this will give you the best results.
4. Connect the air hose to the inside of lid on one of the connectors; this is your air pump line. You will then connect a hose to the outside of this same connector that is just long enough to go to the air pump. If you need to use a bigger pump you will have to merge two air ports on to one line using a t connector.
5. Connect another hose to the connector we have not used yet, on the outside. This will be the hose that has the rigid tube on the end of it that goes into the tank. Don’t make this hose any longer than you have to will not be as effective.
Part Three:
Add the sponge:
You will need the sponge, fishing line, assembled lid, and canister for this step.
1. Measure the sponge against your container it should be a little shorter but not a lot.
2. Thread the fishing line through the sides of the sponge so that you could hang it. This step is not precise as long as it hangs in the canister toward the very top without blocking the air connector ports that is all that matters.
3. Tie the sponge to the lid.
4. Now attach the lid to the canister.
Final assembly:
1. If you have not already add the rigid tube to the hose that is going into the tank (the one without the air stone)
2. Connect the air pump to the other hose
3. Attach cord holders to back center of tank about an inch above the substrate, you will have to reconnect these from time to time because the crabs love to climb them.
4. Snap the rigid tube to these cord holders.
5. Fill canister, using the handy flip hatch, with declorinated water stopping with about 2 inches to spare.
6. Plug in air pump.
It will take the system about 10 hours to really do it’s thing, after that it should maintain a nice level of humidity for you. Maintenance: it is necessary to rinse and dry out the canister every 3 months or so. You should also rinse out the sponge if it is in bad shape replace it. You should check he hoses, connectors, and air stone for mildew. Replace them when needed.
*note* These work best on tanks with glass lids or covered in some way, since it is air and not water it will simply escape into your house instead of staying in the tank.
Please feel free to ask me questions about this, I know there are a lot of steps but it is really easy once you get started :-)


 It's quiet and efficient, I haven't had to refill mine yet!
 I know he will do his best changing food and water. My family and I will miss them so! When I get back I plan on start purchasing the items. Wish me luck!
 Let the riot begin! LOL -
  hahahha
